Growing Ginger at Home: The Secret to Helping Your Family NEVER Run Out of Ginger!
Ginger is a powerful and versatile spice used in cooking, herbal remedies, and even beauty treatments. It is rich in antioxidants and has anti-inflammatory properties, making it a valuable addition to any household. The great news is that you don’t need a garden to grow ginger! With a few simple steps, you can cultivate ginger at home and ensure a continuous supply for your family.
In this guide, we’ll explore the secrets to successfully growing ginger indoors or in a small space so that you never run out of this amazing root.
Why Grow Ginger at Home?
Growing ginger at home has several benefits, including:
- Endless supply – No more last-minute trips to the store!
- Organic and chemical-free – Control how your ginger is grown.
- Cost-effective – Buy ginger once, and grow it continuously.
- Easy maintenance – Ginger is a low-maintenance plant that thrives with minimal care.
- Aesthetic and aromatic – Ginger plants have lush green leaves that add beauty to any space.
Step-by-Step Guide to Growing Ginger at Home
Step 1: Choosing the Right Ginger Root
The success of your ginger plant starts with choosing the right root. Here’s what to look for:
- Fresh, plump, and firm rhizomes (not dried or shriveled).
- Healthy eyes or buds (small protrusions that will sprout into new plants).
- Organic ginger (store-bought ginger may be treated with growth inhibitors, so organic is best).
If you only have store-bought ginger, soak it in water for 24 hours to help remove any growth inhibitors before planting.
Step 2: Preparing for Planting
Selecting the Right Container
Ginger grows horizontally, so choose a wide, shallow container (at least 12 inches in diameter and 8–10 inches deep). Ensure the container has drainage holes to prevent waterlogging.
Choosing the Best Soil
Ginger thrives in light, well-draining soil that is rich in organic matter. The ideal soil mix consists of:
- 50% potting soil
- 30% compost
- 20% sand or perlite (for aeration)
The soil should be slightly acidic (pH 5.5–6.5) for optimal growth.
Step 3: Planting Ginger
Cut and Cure the Ginger Rhizome
- If your ginger rhizome is large, cut it into 1–2-inch sections, ensuring each piece has at least one bud.
- Let the cut pieces dry for 1–2 days to prevent rot before planting.
Planting the Ginger
- Fill the container with soil, leaving about 2 inches from the top.
- Place the ginger rhizome horizontally, with the buds facing upward.
- Cover it with 1–2 inches of soil, but do not bury it too deep.
- Water lightly to moisten the soil.
Step 4: Providing Proper Care
Light Requirements
Ginger grows best in indirect sunlight or partial shade. Avoid direct harsh sunlight, as it can dry out the soil.
Temperature and Humidity
- Ginger prefers warm temperatures between 75–85°F (24–29°C).
- Maintain humidity by misting the plant or placing a tray of water nearby.
Watering
- Keep the soil consistently moist but not soggy.
- Water 2–3 times a week, adjusting based on climate conditions.
- Reduce watering slightly during the cooler months.
Fertilizing
- Use a balanced organic fertilizer or compost tea every 3–4 weeks.
- Avoid high-nitrogen fertilizers, as they encourage leafy growth rather than rhizome development.
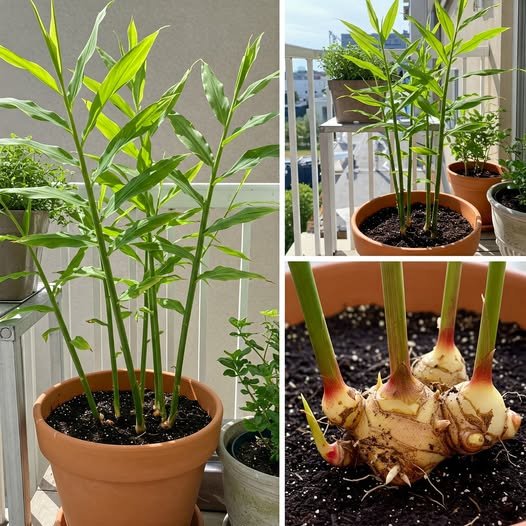
Step 5: Harvesting Ginger
Ginger is ready for harvest in 8–10 months after planting, but you can also harvest baby ginger as early as 4–5 months.
How to Harvest Ginger
- Gently dig around the plant and remove a section of the rhizome while leaving the rest to continue growing.
- If harvesting the entire plant, pull it up and separate the rhizomes.
- Wash off excess soil and allow the ginger to cure for a few days before use.
Step 6: Ensuring a Continuous Supply of Ginger
To ensure you NEVER run out of ginger, follow these tips:
- Regrow from harvested pieces – Save a few sections of rhizomes to plant again.
- Use staggered planting – Plant ginger in different pots every 2–3 months for a continuous harvest.
- Propagate indoors during winter – Keep ginger in pots inside to maintain year-round growth.
Troubleshooting Common Ginger Growing Problems
1. Ginger is Not Sprouting
Possible causes:
- The rhizome is too dry or old.
- The soil is too wet, causing rot.
- Temperatures are too low.
Solution: Keep the soil moist but not soggy, ensure warmth, and be patient—it may take 3–6 weeks to sprout.
2. Yellowing Leaves
Possible causes:
- Overwatering or underwatering.
- Poor soil drainage.
- Nutrient deficiency.
Solution: Adjust watering habits, ensure proper drainage, and feed with organic compost or fertilizer.
3. Mold or Fungus on Soil
Possible causes:
- Excessive moisture.
- Poor air circulation.
Solution: Improve ventilation, reduce watering, and sprinkle cinnamon or neem powder on the soil to prevent fungus.
Creative Ways to Use Homegrown Ginger
Now that you have a steady supply of fresh ginger, here are some ways to enjoy it:
- Cooking: Add to stir-fries, soups, curries, and teas.
- Health Remedies: Make ginger tea for digestion and colds.
- Preservation: Freeze or dry ginger for long-term use.
- Beauty Treatments: Use ginger-infused oil for hair and skin care.
Final Thoughts
Growing ginger at home is a rewarding experience that ensures your family always has a fresh supply of this beneficial spice. With minimal effort, you can cultivate ginger in containers, harvest it as needed, and enjoy its incredible flavor and health benefits year-round. Start growing today, and you’ll never have to buy ginger from the store again!