Potatoes are one of the most rewarding crops to grow at home, and you don’t need a big garden or traditional planting beds to enjoy a bountiful harvest. In fact, many gardeners are discovering that growing potatoes in bags is not only space-saving and convenient—it can also produce a surprising number of tubers.
Whether you’re short on space or simply want a cleaner, easier way to harvest, this guide will walk you through everything you need to know to grow potatoes successfully in bags.
Why Grow Potatoes in Bags?
Growing potatoes in bags is an efficient method that works well in both small spaces and larger garden setups. The bag method offers several advantages:
- Space-saving – Ideal for balconies, patios, or tight garden corners
- Easy to manage – Soil, water, and nutrients are easier to control
Cleaner harvesting – No digging required; just tip the bag to collect your crop
- Fewer pests and diseases – Reduces risk from soil-borne problems common in the ground
This technique works with various containers—commercial grow bags, fabric pots, or even sturdy plastic or rice sacks.
Choosing the Right Bag and Setup
Select a bag that holds at least 10 to 15 gallons (38 to 57 liters). The bag should be durable, have good drainage, and be tall enough to allow for layering soil as the plants grow.
Prepare the bag:
- Poke or cut several small drainage holes in the bottom if they don’t already exist.
- Roll the top of the bag down by a third to make it easier to work with at the beginning.
Place the bag in a sunny location that gets at least 6–8 hours of sunlight daily.
Selecting Seed Potatoes
Use certified seed potatoes rather than supermarket ones, as store-bought varieties may be treated with sprout inhibitors or carry disease.
Steps:
- Choose small to medium-sized seed potatoes. If large, cut them into chunks with at least one eye per piece.
- Allow cut pieces to dry for 1–2 days to prevent rot (this forms a callus).
Optional: Pre-sprout (chit) the potatoes by leaving them in a bright, cool area for a few days until shoots appear.
Planting Potatoes in the Bag
Begin with just a shallow layer of soil, then build it up as the plants grow.
Planting steps:
- Add 4–6 inches (10–15 cm) of well-draining potting mix or garden soil mixed with compost to the bottom of the bag.
- Place 3–4 seed potato pieces, eyes facing upward, spaced evenly apart.
- Cover with 4 inches (10 cm) of soil.
- Water gently but thoroughly.
As the plants grow, continue to “hill” them by adding more soil to cover the stems, leaving only the top leaves exposed. Repeat this process until the soil reaches 2 inches (5 cm) below the top of the bag. This encourages the plant to produce more tubers along the buried stems.
Watering and Fertilization
Potatoes need consistent moisture, especially while tubers are forming.
Watering tips:
- Keep the soil evenly moist but not soggy.
- Water when the top 1–2 inches of soil feel dry.
- Avoid letting the bag dry out completely, especially in hot weather.
Fertilizer tips:
- Use a balanced organic fertilizer (such as 10-10-10) at planting.
- Side-dress with compost or a low-nitrogen, high-potassium fertilizer (e.g., 5-10-10) once the plants are 6 inches tall.
- Stop fertilizing once the plants begin flowering—this signals tuber formation.
Managing Pests and Common Issues
While growing in bags reduces many problems, stay alert for a few common pests:
- Aphids or beetles: Handpick or spray with neem oil if needed.
- Fungal rot: Ensure good drainage and avoid overwatering.
- Yellowing leaves early in growth: May indicate poor soil nutrition or too much water.
Proper spacing, sun exposure, and airflow will help minimize issues.
When and How to Harvest
Potatoes are typically ready to harvest 70–100 days after planting, depending on the variety.
Harvest cues:
- When the plants begin to yellow and die back, stop watering and wait 1–2 weeks to allow the skins to set.
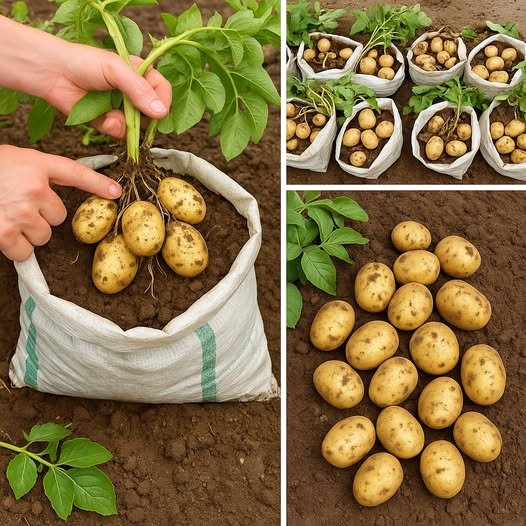
- Tip the bag over on a tarp or into a container and gently dig through the soil to collect your potatoes.
For baby (new) potatoes, you can start harvesting a few weeks after flowering. Just reach into the soil carefully and remove a few without disturbing the plant too much.
Storing and Enjoying Your Potatoes
Once harvested:
- Allow potatoes to air dry for several hours.
- Store them in a cool, dark, well-ventilated place.
- Avoid washing until just before use to extend shelf life.
Properly stored, your homegrown potatoes can last for several months.
Final Thoughts
Growing potatoes in bags is a practical, rewarding gardening method that suits beginners and experienced growers alike. With just a bit of effort and some recycled materials or grow bags, you can enjoy a surprisingly large harvest of delicious, homegrown potatoes—right from your patio, balcony, or backyard.
Give it a try, and you might be amazed at how many tubers one simple bag can produce!